Monday, October 24, 2011

In the beginning...

Cake is love. Where does the name of my blog come from, you ask? Grab a cup of coffee (a frappy, if you are able) and find an old copy of Cooks Illustrated. Then, use the coffee to bake a chocolate cake. Drink the frappy.

In all seriousness, the title of my blog comes from a little taste-test event my best friend, Jenny and I organized years ago.
MLG and JCS
It was in the fall of 2002... I remember the frost on the ground and Jenny and Jeff's house on Dewey Ave with the long skinny kitchen, and bright, open dining room. We had a plan, Jenny and I. Her husband, Jeff was a huge fan of chocolate cake. Neither of us were sure what was the 'best' chocolate cake recipe, however, so we decided to find out so she could make it for his birthday. We each invited judges- for me it was Minh&Matt and for her it was Debbie&whats-his-name, and her brother-in-law, Mark. We prepared for days, testing cake recipes, deciding on the final twelve (!!!) options to sample.
The answer key! Note the chocolate smudges!

We each had made 2 types of chocolate cake:(Curly cake, Black Magic(BM), Godiva Chocolate Raspberry Cake, and Triple Chocolate Celebration(T3)) and with several frostings/toppings that made a total of 12 pairings. With our group of judges, that meant we would need 9 plates, each with 12 tiny slices of cake. But how to rank them? And what to name each one? Or to use numbers?
It was complicated... until we realized we didn't have to number or name the samples- we could use letters!
"W" "H" "Y" "C" "A" "K" "E" "I" "S" "L" "U" "V".  Twelve unique letters, Twelve pieces of cake. And we'd put each letter on a little piece of paper taped to a toothpick. So we decided couples could share a plate and we made 60 of them (4 couples+1 single*12 pieces of cake each). We also stayed true to each original recipe, so for example Triple Chocolate Celebration Cake had the proper frosting/fillings for letter "K". The Godiva cake had the proper fillings for "L", but we also tried other fillings with "Y" and "A". We had our favorite chocolate frostings that we included: cocoa frosting and sour cream frosting(SC). The day of the event, when I arrived at Jenny's house with my two cakes, frostings, ballots and toothpicks, Jenny told me about the interloper. Some friend of Debbie & Jenny's from high school was in town and he loves cake and Debbie told him about our little taste test and he wanted to come so she said 'sure!" I was peeved! Not so much that he was coming (just one more plate of 12 pieces of cake, ugh) but he WAS BRINGING HIS OWN CAKE TO ENTER. As if this was a contest. Nooooooo!!!! We had already printed the ballots, made the toothpick labels, made a huge mess of Jenny's kitchen and I just said, 'no.' He can come, he can bring his blasted cake, I don't care, but he isn't entering it. If people want to comment on his cake, fine. But this is a scientific study on home made chocolate cake! The interloper was bringing a doctored box cake mix! With doctored box pudding filling! Blasphemy!

My friends made me proud. Especially my then boyfriend (now husband), MJM. His ability to discern the merits of each cake and frosting combo was to be admired. And Minh and Matt did a bang-up job judging, too. Honestly, after days of chocolate cake baking and frosting making, and bowl-licking and crumb munching I could barely tell the difference. I was overwhelmed, but tried my best to rate each one both in terms of flavor and texture for both the cake and the frosting. Poor Jenny couldn't even fill in the ballot. We were exhausted!
MLG (me) on the left (notice how everything is mostly 8s and 9s) and Jenny's ballot on the right.
MJM on the left and JAS (Jeff) on the right
Minh on the left and Matt on the right
What's his name on the left and Debbie on the right
Mark on the left and Interloper on the right

My initial plan was to do statistical analysis in Matlab on the results to determine the winner. Unfortunately, that meant a delay, which was deemed unacceptable by the crowd. So we leafed through the ballots... I found it interesting that the frosting or topping really affected the perception of the cake! Consider Jeff's ballot (the only one that really mattered, after all). "W" "E" "S" and "V" were all the same cake- Black Magic cake, but the different letters had different frostings. However, he gave W a perfect 10 and E got a 9 and 8, S got two 8s and E- two 6s!! But I'm sure the only thing you care about is what was decided! Which cake was the winner!? The consensus winner was "W": a combination of 'Black Magic Cake' on Hershey's website and 'Cocoa Frosting' from the Belimar book (a book our friend, Belimar recommended), The Good Housekeeping Illustrated Book of Desserts. A great book, check it out.

But most importantly, what we learned from this experience was: be careful what you wish for. Maybe it wont sound surprising to you, but Jeff actually requested a non-chocolate cake for his birthday that year.

Thursday, October 13, 2011

American Apple Pie

Apple picking is in full swing (and almost finished?) in the Netherlands. Gorgeous, juicy, red apples, freshly picked by our friends Dragan and Biba, appeared at our doorstep. What else could I do? I made a good old fashioned American Apple Pie.
Can I just say "food porn"? In my opinion, nothing compares to American apple pie. Just watch the movie "American Pie" and you'll see what I mean.

If you want to create this delicacy at home you'll need 5 large apples(good ones are Gala or Fuji), flour, sugar, cinnamon, butter, salt, corn starch, and ice cold water. And you'll need some time. First, make the pie crust. Do it ahead of time, the night before, and store your discs in the refrigerator for up to 24 hours(or freeze the discs for up to a month or two) . I love Joy of Cooking's pie crust, a standard pate brisse, which Jenny and I used to call 'Pah-tay Briss-ay' until we heard Martha mention it as 'Pat Briss' and we realized our utter non-Frenchness.

The key to pate brisse is cold butter. No, I don't mean refrigerator-cold butter, I mean freeze it! Take your 230g of butter, unsalted, of course, out of the refrigerator and cut it into little pieces. Preferably, perfect pea-sized pieces, but any small random bits will do. Next, put this mess of butter in the freezer for at least 20 minutes. While you wait, put your flour, salt, and sugar in a food processor, or a large bowl and mix. Once the butter is too cold to handle with your Raynauds-fingers, place it in with your blended flour mixture. Food process it to the beat of "mine eyes have seen the glory of the coming of the Lord..." You know the song, right? Anyway,  if you don't have a food processor, get a pastry blender and get good at it and be quick about it.  Next, add the ice-cold water and pulse-blend until just combined. You'll know it is ready when you can pinch a bit of it with your fingers and it sticks together like playdough. Do not over-blend. Trust me. And don't let the butter even think about getting warm.

Place two large pieces of saran-wrap on the counter and put half of the dough in each piece, shaping it into a flat disc using the edges of the saran wrap. Try not to handle it too much. If the dough does not feel cold, put it in the fridge for a few minutes before shaping it into a disc. If you keep the butter cold throughout this process, your mouth will thank you when you bite into the lovely flakiness later.

Leave the two discs in the fridge overnight (preferable) or for at least an hour. Pre-heat your oven to 425 degrees F (210 C). Take each disc out and flour your work surface (use a piece of wax paper or parchment paper on the counter), flour your rolling pin, wait a few minutes for the dough to be rollable and go for it. If you try to roll it and it breaks apart on the edges, it is still a bit too cold. But don't let it get warmer than about 68 degrees F (20 C). Roll it into a circle for a 9" pie plate.  The overall thickness is less important than just getting it consistent and big enough for your pie plate.
Once it is rolled, place it in the fridge on a cookie sheet to keep it cool while you do the bottom crust. Do the same thing for the bottom crust and then flip over your paper and place it in the pie plate. Trim the edges to the edge of the pie (if you are making a top crust) or to about 1 inch overhang (and fold under) if you are not making a top crust. Place the bottom crust (that's in the pie plate) also into the fridge to keep it cool as well while you make the filling.
If you have an 'Apple Peeler Corer Slicer" machine, use it! If not, get your apples ready manually. You should have about 5.5 cups of apples, or a large bowl-full.
Next, add the cornstarch (3 Tbsp), sugar (3/4 cup), cinnamon (2 tsp), and lemon juice from half a lemon and stir it up well. If your apples are super sweet you can reduce the sugar to 2/3 cup or even less. Viktorija would say, "use less sugar!" She is smart.
Let this mixture sit for about 10 minutes, stirring occasionally, and when the timer goes off, get the pie crusts out of the fridge and pour the mixture into the bottom crust.

Now, run a finger dipped in cold water around the edge(so the top crust will stick), dot the top with bits of butter (about 2 Tbsp total) and then place the top crust on, peeling back the paper as you do.
Trim the top crust to hang over about 1 inch, and then fold it underneath the bottom crust on the edges.
Crimp the edge by pinching with your thumb and first finger on one hand and your first finger on the other hand. Or just use a fork like my grandma used to do- pressing it around the edge to make lines. If you have a thin spot, just use some of the scraps you have from the trimming to thicken it up from underneath. If you have lots of scraps and feel like being creative you can re-roll them out and use a cookie cutter to make a pretty topping on your pie. But be quick about it, or do it ahead. The total time for you to get the filling in, top on, decoration done is less than 5 minutes. Apply the cut-out shapes with cold water to make them stick.
Sprinkle the top of the pie with a mixture of sugar (2 Tbsp) and cinnamon (1 tsp) (it will stick better if you sprinkle a tiny bit of water on the pie first) and put a few slits in the top crust with a knife. I've done four above.

Damn, this is starting to sound complex. We're almost done. I promise, it is worth it.
Bake the pie with a cookie sheet on another rack placed underneath the pie to catch the drippings. You'll want to bake it for 30 minutes and then turn the oven down to 350 degrees F (175 degrees C) and put a pie-shield on and bake for 30 to 40 minutes more, or until a knife reveals bubbly juices.
If you don't have a pie shield you can make one out of foil, or skip it and deal with a slightly burned edge. You can see the apple shapes I put on top got a little bit burny. I could have covered them with foil to prevent this.
Serve the pie after a few hours (the inside will set-up nice). The pie is best the day it is made. Here is another example in a prettier pie plate (and it is slightly larger, too- 10 inches, which also works fine.)
If you make this pie for your boyfriend, he will ask you to marry him. It totally worked for me.

Wednesday, October 5, 2011

October is here! Squash Soup all around!

The fall season makes me so happy. Crisp, chilly mornings giving rise to gorgeous bright crunching leaves days reminds me of going back to school and the upcoming HALLOWEEN! Outside our bedroom window we can see our neighbor's maple tree and it has just started changing to a deep pink and bright orange with some bits of yellow. Gorgeous! Squash and pumpkins are on the market now and I was fortunate enough to buy some (including a typical American style pumpkin for Halloween!!) when we were in Germany a couple of weeks ago.
 

I spent 20 euros on these puppies because we didn't have change and I was so excited to see the road-side stand with the American style pumpkin I just kept putting them in the box until I had 20 euros worth. Mental note: 20 euros of pumpkins makes me quite happy for many days. And my kid, too!


Look how happy she is with the funny double-pumpkin! The two green ones at Dina's feet are called Buttercup squash and they are outstanding.

Fine Cooking once published a Buttercup squash and leek soup which I've long forgotten the exact measurements, but here is the method:
Make or purchase broth- preferably a veggie broth. You will likely need about 2 cups (500 ml) for one squash and 2 leeks.  Next, get a stock pot and add your rinsed, chopped leeks (about 2 leeks, or one if your squash is small or your leek really large). If you haven't cooked with leeks before here's a little info video I made:


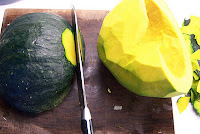
Next, you'll slice your squash in half, scoop out the seeds with a spoon and flip it cut side down. Carefully cut the skin of the squash off, using the cut side down method as much as possible to prevent your knife from slipping on the tough skin. Cube squash into 1 to 2 inch squares and throw these on top of the leeks. Next, pour in enough broth to almost come to the top of the squash. If you cover the squash with the broth you will have a thinner soup. I prefer a thicker soup, but either way will work.
Bring your pot to a boil and once it is boiling, simmer for about 20 to 30 minutes or until you can prick the squash pieces with a fork and they just fall apart. Next, use an immersion blender to blend the hot soup together and make a nice smooth texture. If you don't have a hand held blender, you can do it in batches in a traditional blender. Just makes for more containers to clean-up.
Serve it, piping hot, with a dab of butter or extra virgin olive oil. I prefer the flavor of butter, as shown above. To prevent the squash soup from being too thin: before you blend the soup with the blender, remove some liquid, taking care to leave the leeks and squash in the pot. Sometimes I remove about 180 ml (1/2 cup) or more, if I think the squash seemed to release a lot of water. Don't throw this away! Keep it and then, blend the remaining squash, liquid and leeks and check the consistency. If it seems too thick, I slowly add the reserved liquid until I reach the desired thickness.

You can find these buttercup squash at the local markets (definitely the Eindhoven market on Saturday mornings) and also Genneper Park (I am starting to feel like an advert for them!) sometimes has them in their farm market. 

If you wish, you can substitute butternut squash (Flespompoen) for the buttercup, but you'll be missing out on something. Butternut squash is good, no lie, but trust me: the buttercup squash will blow you away.

Happy Fall, everyone!

Starbucks products at Jumbo!

Ooooohhhh guess what!! The Jumbo in Veldhoven has Starbucks prepackaged Qandi Latte Caramel Flavour Coffee! And even used the British spelling of 'flavor'!
And another flavor too- Mocha. This was quite a treat, and the caffeine content was double the amount in normal coffee, as in classic Starbucks fashion.  They were on sale and so I justified my purchase by deciding that 2 euros for one of these was less than a third of the frappy at the airport. Good shopping choices, right?