Before my daughter's third birthday I asked her what she wanted for her party theme. She was not sure and we spent a lot of time looking at cakes. At some point we were looking at the photos from when she rode a carousel in Obernai, France, and she got excited about a carousel theme. Sometimes looking at assorted pictures to discover a theme is even better than looking at cakes!
Grateful for the challenge, I spent time researching carousel cakes online, and considering how I could suspend the top cake. As it turned out, one of our drinking glasses was just the right thing for the center. Lucky for me, my husband likes to both sample and give advice on my cakes and he said there was 'no way' one single glass in the center was enough to support the top tier, without it potentially listing to one side. Cake dowels would do the trick- stuck right down into the bottom two tiers of cake all the way to the top tier, and also double as the poles for the four horses. And wouldn't it be great if the whole thing could spin? I thought why not use my old-school decorating spinner as a cake base to make it rotate just like a real carousel. Made it easy to decorate, too.
The horses were made from sugar cookies. A benefit was they could be made a couple days in advance.
It is almost impossible for me to make a cake without coordinating cupcakes, but I was concerned about the complexity of this particular cake so I simplified the cupcake decorations by using the (now discontinued) Wilton waxed carousel horse candles. Yes, I found them on discount, and bought them early in the planning process because they were so cute I could not resist them!
I rolled out ovals of the white marzipan and in advance painstakingly placed colored sprinkles in a design to spell out Happy 3rd Birthday Dina (as a test of my patience), as well as a bike, boat, and hot-air balloon. Allowing them to dry on the side of the cake pan I planned to use for the top layer made them the right shape.
We printed a large poster of Dina on a carousel in Rome, as well as the inspirational one of her in Obernai, France to cover our normal artwork in the living/dining room during the party.
Dina's talented Uncle Dan made the invitations and the pin the tail on the carousel horse game for us.
Naturally, our dog Lacey was riding the horse.
As if the day could not get any better, my neighbor, who owns ponies, stopped by when she saw our balloons to see if Dina wanted to sit on a pony on her birthday. Totally unplanned, and completely perfect.
All in all, Dina was thrilled.
I found a colorful banner at our local Albert Heijn (grocery store in
NL) and it was completely customizable, although I had to create the
little 'RD' superscript for the number 3.
Fortunately, I had help from my mom in the decorating and babysitting (it is impossible to spend this kind of time on a party without help from grandparents!) and my dad in the food preparation. He made his famous meatballs, snack sized! Now you know where my love of making food comes from. Check out these mouth-watering meatballs.
The top cake layer took some advanced planning, so I did end up making a test cake to be sure I had the details right.
I made a cardboard template to enable carving the top layer into a peak. As you can see I only put a little circle of cake on the top to start with as the very top comes to a steep peak, so most of it was shaven away with a serrated knife.
In order to make the red stripes on the top the right size, as well as for the sizing of the ovals on the side, I needed to determine the spacing, hence the toothpicks shown on the basic buttercream frosted top below.
I created all my templates when I did the test cake, which made the final cake go smoothly.
The red stripes on the top tier were marzipan and the alternating white was the buttercream underneath. I used marzipan for the red stripes to make it easy (despite the red dye warning they include on the packaging here), and I choose to not serve the red part to the kids.
The cake below the horses was a two tier cake- the very bottom an 8 inch butter cake with strawberries and cream, and the middle tier a 6 inch (to match the 6 inch top) chocolate with ganache filling, both frosted with the fancier Swiss buttercream.
These cake recipes are a hit with a crowd, and this version was no exception. To assemble, I 'glued' a small piece of round cardboard to the glass in advance and then placed it into the frosting on the bottom tiers, dotting buttercream around the side to hold it in place. The dowels were inserted, measured and then cut to size. I also dotted around the dowels with buttercream for looks.
When I assembled and frosted the top tier with the stripes, I did so on a special cardboard round I had previously made so that the glass would nestle into the bottom (two layers of cardboard to fit inside the glass):
Next, the top tier was placed on the supports, fitting the small glued circle into the opening of the glass. I dotted buttercream around the edge of the cardboard after I placed it.
The dark purple was also marzipan, and the only piece of the cake that I would have done differently if I could do it again: the floppy-ness of the accents in between the ovals on the top tier disappointed me. I kept trying to keep them from flopping over (see photo below- that's my irritated smile look).
For favors, I made smaller horse sugar cookies and packaged them in bags with each child's first initial to seal them shut. Other tidbits included a noise-maker, temporary tattoos, band bracelets, Belgian chocolate, and a candy stick (which were originally going to be the poles for the horses, but didn't work out structurally). The bags matched the banner and were also found at AH.
This cake was one of my favorites that I had made (at the time, over a year ago) and I am certain it was the planning ahead that ultimately made it possible.
Now I need to catch up on my posts and show you Dina's 4th birthday cake!
Choosing a theme for Dina's second birthday was exciting to me, because for the first time she could tell me what she wanted. Unfortunately, she didn't have much to say about it. "Chocolate!" was about all I could get out of her with respect to a theme. Since her favorite toy at the time was her Fisher Price farm we got at Queen's Day (giant garage sale) the previous year, I decided to go with a Barn-Yard bash.
My first challenge was finding a plate big enough to hold the design- Inge saved the day in that regard. The white platter I used is HUGE- 20 inches across (51cm). My sweet husband used sketch-up to create a barn coming out of a 9" round cake, complete with silo, so I'd have measurements. My biggest concern was getting the proportions correct, so I modeled the animals to be similarly sized to the little plastic ones Dina loved. I only had the horse and chicken to work from, so for the rest of the animals I had to wing it.
About two months before hand I made a test cake to check my estimates of the sizing with respect to her plastic horse:
The size of the little plastic horse looked decent, and this gave me an opportunity to measure an actual cake, frosted. Using sketch-up for the sizes, I cut out graham cracker pieces for the barn and glued them together using Royal Icing. I had to use a small box to prop it up to dry.
My friend Marieke holding the printout of the sketch-up design:
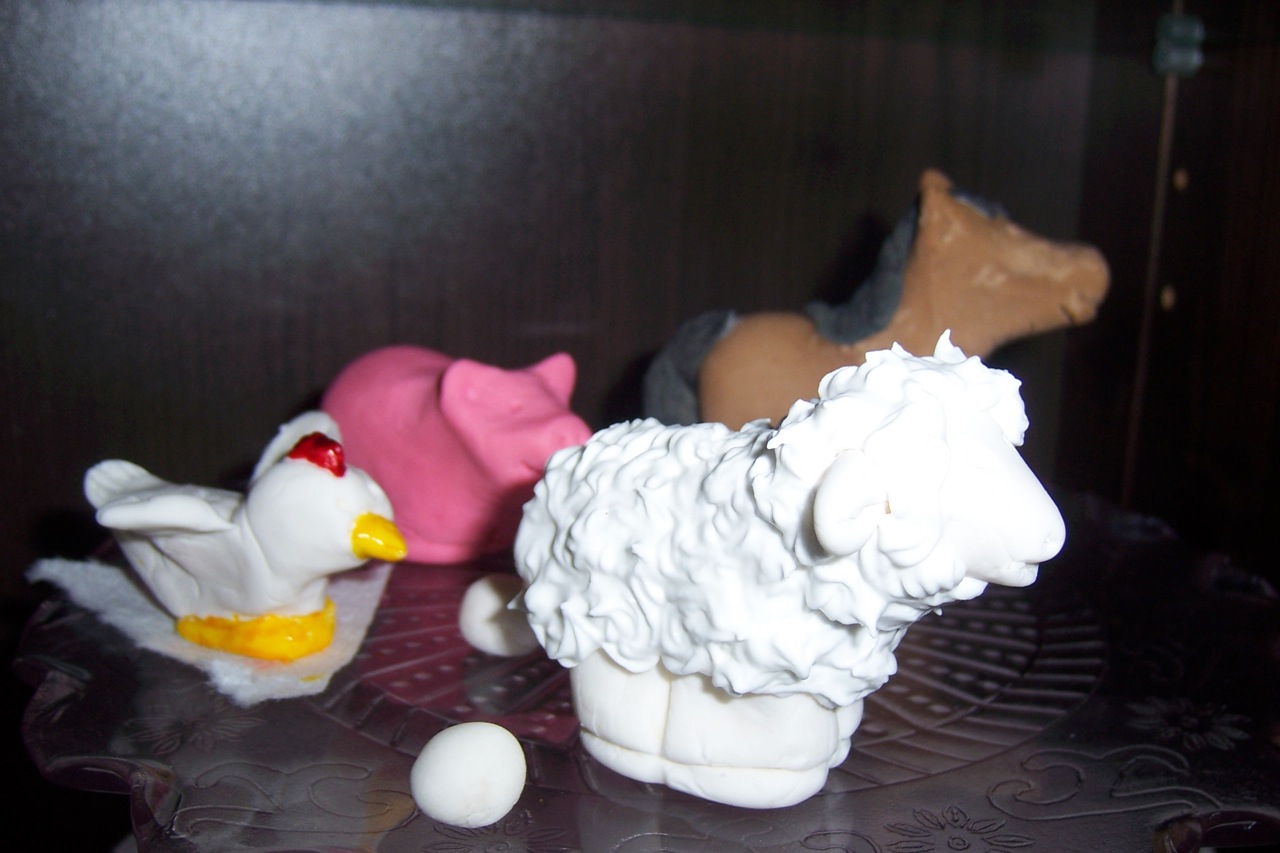
Creating the animals out of gum-paste took me several hours, over the course of several nights. Once I had a couple made, though, the rest of them went much quicker than the first few.
My favorites were the sheep and the pig. They just looked so friendly! I didn't end up using the chicken eggs that I made. The bright colors(like the chicken's feet) I got by applying Wilton gel-coloring directly to the finished animal. Made for a bit of a mess, and tough to handle without getting the color everywhere, but it looked bright.
The stone path was also made using gum-paste, and I didn't blend the gray/black colors completely, so I could get a mottled texture for some of the stones. Using a piece of plastic wrap inside a small bowl, I made a blue jello pond (only half the recommended water in the recipe) which I let set for a day in the fridge and placed it at the last minute on the platter for the duck to swim in. Interestingly, within a few hours the gum-paste duck began to literally melt into the jello-pond.
The silo was made with a cupcake placed on top of the cake, and graham cracker pieces to form the edges. I coated it with royal icing (the barn too), and got the bright color by using Wilton's no-taste red gel coloring.
The inside of the cake was chocolate (of course) with a chocolate ganache filling. My friend Sam (above) really enjoyed the royal-icing coated graham crackers and was excited to try a chicken wing.
The only thing I did not get a chance to do was my plan to have the writing on the cake be made by a sky-writing plane. My idea was to have the exclamation point trail off a bit with a plane below it, as if it just completed writing in the sky. But I ran out of time.
The cake and the grass are buttercream icing, and the pig's mud is crushed Oreo cookies. The chicken is hanging out in crushed cookies, too and the horse has a bit of Haribo candy coil in the barn. I made the small hill the sheep is standing on using the shavings from the cake (to make the cake flat on top).
What was most important was my Dina's reaction. And it was priceless:
She gave it her all blowing out the candle:
The benefit to using gum paste is that when your creations dry, they are stiff, unlike fondant, which sags if you leave it at room temperature. The animals were made a few days in advance, so by the time we ate the cake, they were quite hard. The stone path I made the night before, so the stones were still a bit soft but did hold their shape okay. Everything on the cake was edible, and we ate (almost) every last bit.